Sometimes it's okay to be a follower! :)

Blogaholic Designs”=

I was featured!!!

Photobucket

All Things Thrifty


DIY under $5

Friday, September 30, 2011

Kid craft- Witch hats

I am sure others have made witch hats like this, but I didn't look to see how to make one. I just came up with it with the supplies I had at home. I used a paper plate, construction paper, and a cup and then craft decorations for the girls to decorate these with. It was so easy and so cheap because I already had all of the stuff! I do need to find a better way to help keep the hats on the girls. So if you have a better way, go for it!

Here are their hats:

Audrey and my niece Hazel.

Hazel

Fall craft- pumpkins made out of plastic cups

I came up with this pumpkin idea the other day. I was just experimenting with a cup that I had and a napkin and thought it would be cute to make a pumpkin with it! I didn't fill it with candy or anything this time, but you certainly can. In fact you can use it as a visiting teaching treat, a treat to give to your neighbors, a treat to share at school, etc. I am going to probably make some of these for Audrey's friends at school for when she is in charge of the snack but I am going to find mini cups, (Which they have at the dollar store), and make mini ones for her friends! Isn't it cute?!

You could make it plain without a face like this (which I like better if it is for an adult treat). I do also like this as just a decoration too.

Or you can add a face to it, which would be cute for little kids. 
Isn't it fun?!


Tuesday, September 27, 2011

Kid craft- Fall wreaths

I found this idea off of pinterest again. Brandon and I took the girls to the mountains yesterday for family home evening and the colors on the trees are so pretty right now. I decided to snatch some leaves from the mountains to use for the fall wreaths I wanted to do with the girls. I love the different colors of leaves that we found. So pretty! I LOVE fall! Love it! Love the crunchy leaves, the colors, the little breeze that you get when fall is here, Pumpkin pie, Halloween, all the fun fall/halloween festivities! It's just so much fun!

Here are the pictures of the girls doing their craft.

All smiles!

Even Gracey wanted her picture taken! She is such a cutie! 

Little Miss's finished wreath! 


My niece Hazel


Only little girls would think to use this as a purse! :)

Left to right: My niece Olivia, Audrey, my other niece, Hazel
I love how they all have their own unique look to them. 

It was very hard getting all three to look at the camera. So this will have to do. :) 


Sunday, September 25, 2011

Spotlight of the week-Jamie

My sister Jamie was the spotlight of the week last week. It was also her Birthday last week so we did a combined Birthday/spotlight gift for her. I didn't make anything homemade for her this time. I feel like I didn't have enough time last week to work on it. Not only that but I had another coupon for JCPenney and I was able to find her a cute necklace and earrings that cost me $1.00.

One of Jamie's favorite sweet things to eat, is "Dunford donuts" chocolate donuts. I figured since it was her Birthday too, that I could get her her very own chocolate donut. Well, I went there and they didn't have one single chocolate donut. They had a dozen of them or about 16 or so of them, but they didn't have any single ones that I could buy and it was expensive to get a dozen of them.  I was very sad about this. So, I ended up getting her a different flavor. I am so sorry again Jamie. If I had more time and if I thought about it sooner I would have gone to a gas station to get you one. Maybe next time.

Anyways, Jamie is such a great big sister. She's always complimenting me and others and is a great example to those around her. She is so smart and really can put her mind to anything. She has always been a great example to me growing up. She tought me by example, how to save money and not spend it on stupid things. She has always stayed true to her beliefs and I admire this about her. Love you Jamie! Happy Birthday and Happy spotlight of the week!! :)


Tuesday, September 20, 2011

Wilma costume necklace

Audrey is going to be Wilma for Halloween this year and I just finished making her necklace for her costume. I made these out of white gumballs. I think this gumball necklace idea is so fun for kids to have.I am also in the process of making her costume. I will post pictures and maybe the "How to's," later when it's finished. Probably when it's closer to Halloween though. Here is the link to the tutorial for this gumball necklace again.

Monday, September 19, 2011

Young Womens- Good works value experience #1

I forgot to mention in my last post that during my lesson yesterday I gave the girls time to read all of the scriptures for Good works value experience #1 and then I made (With help from my husband) a chart to help them keep track of the kinds of service they see their family, friends, neighbors, etc, doing each day. I figured since we were talking about service for the lesson that we might as well pass off a value experience while we were at it. We did the same thing last week but with Good works value experience #3. Hopefully this idea will help them to keep track of what they need to do and hopefully they will keep it for a long time so that they can look back on this and remember the service they saw somebody give and hopefully do the same for others!

Anyways, this isn't the cutest chart. I decided to do this at the last minute and really late on Saturday night, so that's why I didn't have time to make it look cute but it works.


Sunday, September 18, 2011

Young Women lesson 32 handout

I made this handout for my lesson today that was about service in the community. I was at the dollar store and saw these "Now and Laters," and knew that I could do something with it to go along with my lesson. This is what I came up with. I am sure there are other better ideas out there, but this worked for me!


Oreo Marshmallow bars

I call these Oreo marshmallow bars. I don't think that's the real name for this dessert. I found this dessert from this site. They are so easy to make. I made these three different ways just to see if there was a difference.

First time: I melted my marshmallows over the stove and doing it this way kind of made these bars flat.

Second time: The next time I made these, I microwaved the marshmallows like the recipe says to do, and when I took it out of the microwave I flattened out the marshmallow to stir it up and then I added in my oreos. They seemed to have done the same thing when I melted the marshmallows over the stove so I ended up folding the bars over to double in size when they were a little cooled off, and it did add that extra thickness I was looking for. It turned out better once I did that. I did also garnish it with left over oreos too.

*So then the third time I made them, I actually forgot to put butter in with my marshmallow and instead of flattening out the marshmallow when it was done cooking I just added in my crumbled up oreos and it seemed to keep the fluff a little better and I actually really liked the taste of it a lot better.

So there you go. That is what I learned from making these. Feel free to use my suggestions! It might save you some time and money! :) If it doesn't turn out how you like it though, please don't blame me. This is just my opinion on what I think tastes good and what worked out for me. :) You may feel differently. :)


Saturday, September 17, 2011

Young Women's personal progress jars

I put together jars for each age group in young womens for personal progress. Whenever they pass off an experience they get to put a cottonball in the jar. Whichever age group fills it the fastest wins a prize. The one prize that we thought of was taking them out for ice cream. We haven't really thought of any other ideas, so if you have any, they would be greatly appreciated! :) Where I originally found this idea, one of the prizes was having a sleep over at the Young Women's presidents home. That was a cute idea too.

Here are the jars I made for each group. Hopefully this will motivate the girls to do their personal progress!!!!


Friday, September 16, 2011

Homemade Play-doh

I found this play-doh recipe from Pinterest, and decided to make it for the other part of Audrey's friends birthday present. Audrey and Livy (my niece)  had a good time making them and playing with the left overs!


So anybody that knows me, knows that I really really really do not like play-doh. I really don't like the smell of it. I know there are some out there where you can add kool-aid and jello mixes to make it smell good but I just was not sure if it would stain their hands especially if they got their hands wet. I don't know, maybe not, but instead of doing it that way, I used this recipe and I  read somewhere to use cinnamon to drown out the yucky play-doh smell. The smell was definitely more tolerable after I added some cinnamon. I recommend doing that, unless you love the smell of play-doh. :)


******Just in: Apparently I don't know anything about how to store home made playdough. Please don't copy my version on how I did the playdough with putting it in plastic baggies. It kind of got moldy after a few days. Sorry about that. I know that I should have put them in an air tight container but I did not know you are supposed to store it in the fridge to prevent it from getting moldy.  I am so sorry, wish I knew this before!!******

Fabric tutu skirt

I saw this skirt on Pinterest and really loved it. I decided to try one for Audrey and I will make one for Gracey too. I think it turned out okay. I just need to get some cute socks to go over her boots and it will look cute and I will probably have her wear a different shirt with this skirt. Other than that, I think it turned out pretty cute. :)


I first cut my pieces. I actually doubled the fabric and cut the strips. I used about 30 strips for Audrey's skirt and I just measured the length from one of her other skirts that she wears.

I then tied a slip knot onto each strip of fabric

Then I slid it on the ribbon.

And tightened the slip knot. 

Then when I was done adding all of my strips to the ribbon, I just tied a bow on the side. 

My husband thinks this skirt is something you should use for a costume. Does this look too much like a pirate outfit when she is wearing it? I really want to know what you think, so please tell me! I was thinking of having her wear this for family pictures but if it looks too much like a costume, please tell me.

Just because

I bought these reese's pieces a little bit ago and wanted to make this for Brandon. Just a little treat to show him how much I love him. Sometimes I feel like words don't really explain how much I do love him. That is why I wanted to make this for him!

Gumball necklace

I decided to try the popular gum ball necklace that you see around other blogs these days. I made this for part of Audrey's friends Birthday present. It really was so fun and easy to make. I for sure want to make these for party favors for Audrey's Birthday party!!! Go here for more detailed instructions.


Monday, September 12, 2011

Spotlight of the week

Audrey picked out her Grammy and Papa (AKA- Brandon's parents) as the spotlight last week. There really was no rhyme or reason to why I put their gift together the way I did..but it works. Brandon's dad really loves snickers, music, service, movies, dunfords chocolate donuts and loves being a Grandpa to his 5 granddaughters and one grandson!  Brandon's Mom loves to sew and be crafty, loves to organize, knows so many tips on how to clean things, loves to serve as well, etc. She is an awesome Grammy to her grandchildren. She really is one smart woman too!

So, here is my explanation for what I bought them for their spotlight gift:

Serving tray: Because they have served us so much and have served so many people, I thought it would be nice to serve them! ;) get it?!

Snickers: Brandon's dad's favorite candy

Framed pin cushion found Framed pin cushion: For Brandon's Mom because she is an amazing sewer and it doesn't hurt to have more room to put your pins on. :) The pin cushion on this site turned out way better than the one I made. I didn't have the directions in front of me when I did mine and just kind of winged it!

Cupcakes: Well... because I thought they deserved another treat! :)

**Funny story: I was putting tissue paper down at the bottom of the serving tray so that I could put the snickers and everything else on top of it, to kind of make it look cuter. Audrey was watching me as I did this and she says to me "Mom, that looks funny." Haha! I just laughed and actually agreed with her. It did look kind of funny. I am so glad that she was paying attention to that!!**


Young womens handout lesson 31

I got my inspiration from this amazing blog! She has so many great ideas for handouts for young womens. I am going to use a lot of her ideas for my upcoming lessons!! Anyways, instead of popcorn, I used blow pops for my handout.


Recipe- Oreo cupcakes

I found this recipe on Pinterest again! I am determined to make everything I pin on pinterest!!! These were pretty tasty! You should give them a try. Go here for the recipe. The only thing I did differently with mine, is I actually just made the cupcakes using a cake out of a box. From my experience, Duncan Hines is the best cake you can get! It's always so moist!!!!!! I will never get any other brand again, actually!


Wednesday, September 7, 2011

Slap bracelets re-do

So, I am sure that a lot of you have seen others re-do these slap bracelets lately. I think it's such a cute idea. You can decorate them in so many ways! Here are just a couple that I quickly put together. Mine could be cuter and I have other cute ideas. I just have not been able to do a lot of them yet. Anyways, here is how I re-did my bracelets:


This is what they looked like originally

I cut the edges of this plastic off to round it more. 


I then measured to see how big I needed my fabric. You want it big enough that the fabric folds over the slap bracelet....

...like this. 

Then you cut out that piece of fabric.

Fold it in half with the wrong side on the outside. 

Then you sew it along the edge. Using a sewing machine would be much easier. But I don't have one, so I had to do it by hand. It didn't take very long do to by hand anyways because it doesn't have to be perfect.

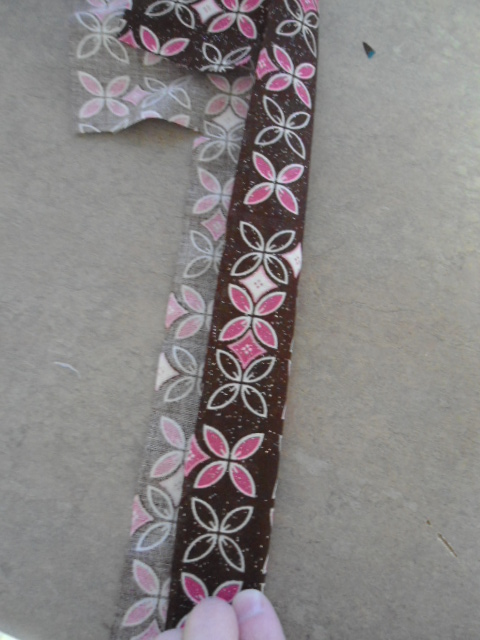
Then once you are down sewing, flip the strip right side out. 

This is what it looks like flipped out. 

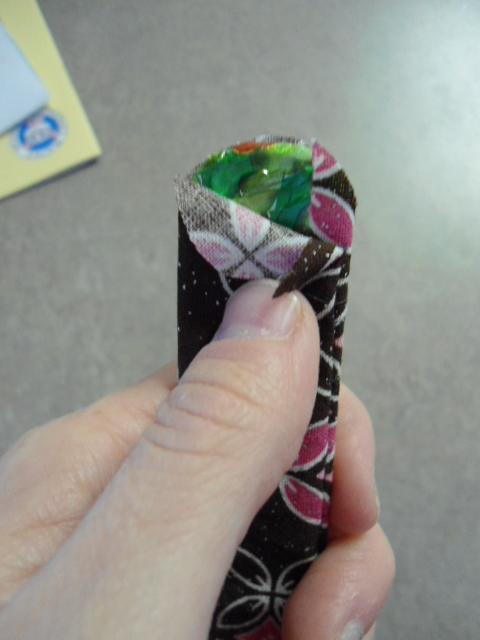
Then you slide your slap bracelet in it. 


Use your scissors to round the edges again.

Then you hot glue the edges.

Your done! Except if you want to add an embellishment to it, which I want to and will, but I only had time to show a basic look of this slap bracelet. 

**By the way, there is a much easier way to re-decorate these (not for me apparently. :) The easy way would be to put your slap bracelet on your fabric or ribbon and trace (2 pieces, one for each side)  to the shape of the slap bracelet and then glue it on. But for some odd reason, this process did not work for me. My slap bracelet wouldn't bend when I did it this way. The reason I know this way works, is because my sister-in-law made some and hers worked just fine. So, I don't know what happened with mine. But the way that I showed you works really well too..thanks to my husband for giving me the suggestion!**