


Wednesday, August 31, 2011
Decorated clip board
I got this idea from pinterest! Surprise! Haha! Anyways, it was Audrey's friends birthday party today and I thought it would be cute to make one of these for part of her gift. I like how it turned out. I can't wait to make more when the occassion arises! :)

Rosette wreath
I was in the middle of making some rosette flowers for the spotlight gift this week and was thinking of other ways I could decorate these rosette flowers with. The fabric that I used matches really well with my decor in my house, so I thought I would just attach these flowers to my stick wreath (Not sure the technical name for this wreath :)), I already had on my wall. I love it! It gives it a nice touch!


Thank you gift
My sister Holly willingly takes my girls when I need her to. My other sister would too, but she lives further away from me than Holly. I feel bad because Gracey is a hard one to babysit because she is such a Momma's girl. This was just a little thank you gift I made for her for watching my girls!
She was willing to watch my girls this morning on such short notice and I decided that I needed to make her a thank you or something. I had some of these donuts at home and quickly came up with a fun saying to go along with it!

She was willing to watch my girls this morning on such short notice and I decided that I needed to make her a thank you or something. I had some of these donuts at home and quickly came up with a fun saying to go along with it!

Sunday, August 28, 2011
Spotlight of the week- Adalie!
Audrey picked out miss Adalie's name for the spotlight of the week. Adalie is Audrey's little cousin that is a year older than her. Adalie LOVES clothes/ dresses. LOVES them. So, I just so happened to have a $10 off your $10 purchase at JC Penney and found this cute dress that was on clearance and spent $1.06 on it! Score!!! Audrey helped me pick out the dress too. I was having the hardest time deciding between this dress and another one and could not make a decision, so I asked Audrey to choose one and she liked this one. :) I actually made the blue/purple bows that I connected to the dress a couple of years ago when I was selling bows and it just so happens that the bows matched her outfit pretty well!
Adalie absolutely LOVES her dress and bows and it looks so cute on her! :)


Adalie absolutely LOVES her dress and bows and it looks so cute on her! :)


Recipe- Milky Way Ice cream cake!!!!!
Oh man! If you are on a diet this is not something you should be eating!! Just warning you! :) This is the dessert I was going to make for my date with Brandon the other night but decided to wait to make it for when my parents came over for dinner and dessert. They loved it! I found this idea on Pinterest! That is an evil site by the way! The site that I got this idea from is temporarily unavailable. I will try to remember to post the link later. So for now, here is how you do it:
Gather all of your ingredients. The recipe that I used, used all of these ingredients, but you can definitely change the type of chocolate you want to use and make it to your liking. I think next time I will make an Almond Joy ice cream cake with coconut. Mmm....sounds yummy to me!


Gather all of your ingredients. The recipe that I used, used all of these ingredients, but you can definitely change the type of chocolate you want to use and make it to your liking. I think next time I will make an Almond Joy ice cream cake with coconut. Mmm....sounds yummy to me!

Then you unwrap your ice cream sandwiches and place them in your dish. I used an 8X8 dish because we certainly didn't need anything bigger than that.

Then you take your caramel and fudge and spread it onto the ice sandwiches and then top it with the broken up chocolate. ( I used about 10-11 miniature sized pieces.)
Tip: I warmed up our hot fudge first and then spread it on the ice cream sandwiches. It was easier to spread it onto the sandwiches that way.

Then you add your whip cream to the top of that.
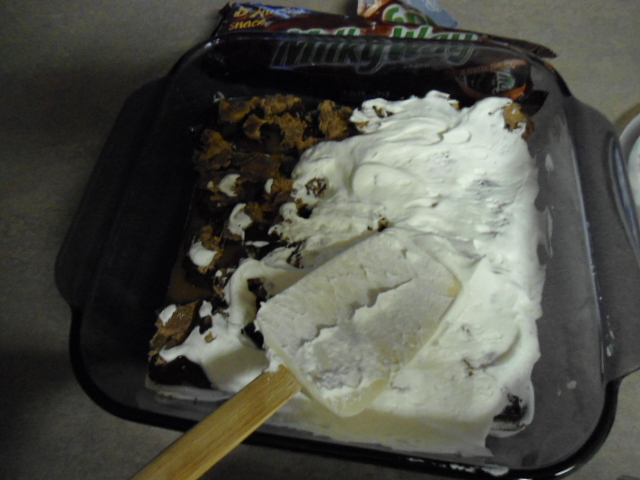
Then you put another layer of your caramel and fudge and chocolate on top

After you are done putting it all together put it in the freezer covered for a few hours until ready to serve. :) SOOO easy!

Then you serve it and enjoy!!

Craft- A change of heart
I was in charge of doing a lesson today in Young Womens. My first lesson since I got put in too! Anyways, the lesson was on having a change of heart. So, I got this idea off of http://www.sugardoodle.net/. I made some rice crispy treat hearts to go with the lesson, but the funny thing is..I was thinking about doing rice crispy treat hearts before I looked on sugardoodle.So, apparently me and somebody else think alike! Here is what I made. :)


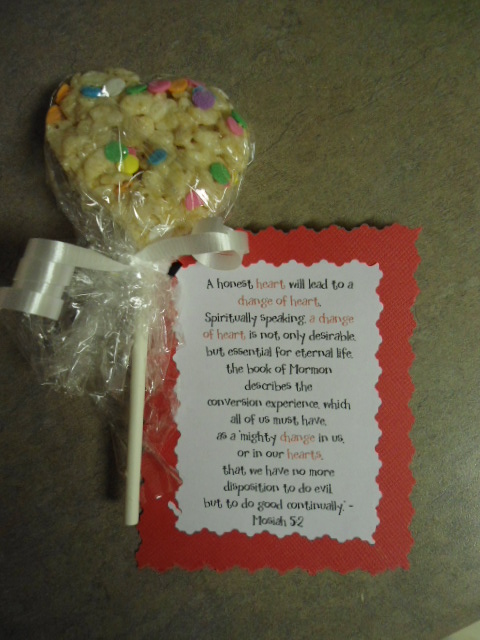

Then, of course you need to make one for your daughters when they wake up in the morning!
PS. please don't mind that white stuff on her plate. The plate is clean, I promise. I am not even sure what it is.


Friday, August 26, 2011
Recipe-Cinnamon streusel pizza bars
I found a recipe that is supposed to be similar to Dominos cinnamon streusel pizza. But, I made a couple of changes to mine. Here is a good recipe for it. Instead of the olive oil, I would use real butter. I was not a fan of how the streusel smelled with the Olive oil. You can definitely try it, but I personally like it better with butter!


Thursday, August 25, 2011
Homemade gift bags
I got this idea from pinterest! I am pretty much addicted to that site right now. Anyways, I needed something to put my next spotlight of the week gift in, and I saw these and decided to make one. Now, this one isn't the best one out there and I will be more creative with it next time. But it was sooooo easy to make. Unfortunately the battery in my camera died when I was making this and I was too excited about making it that I didn't want to wait until my battery was charged to take step by step instructions. I will make another one soon and post instructions or you can just go to this site that I learned it from here.


Date night jar
I decided it would be fun to make a date night jar! So, whenever we by chance go on a date, we can put a slip of paper in the jar or any item in the jar that has to do with the date you want to do for that night! It may be a cheesy idea, but I really like it. And I just had this extra jar laying around, so I figured I might as well! I made some little tags for Brandon for our date yesterday and it was really fun! He didn't even know we were even having a date night! It was a nice surprise for him to see this jar before he left for work! It would be a fun surprise to see when Brandon puts a slip of paper in there too! It would be like opening presents Christmas morning, finding a piece of paper from Brandon in this jar! haha!
K, so it was really late the other night and I was really tired and did not have any ambition to make this jar cute. So, this is what it looked like before. Not cute at all. Although I was pretty proud that I came up with some of the phrases to go with the items that I put in the jar, especially with it being so late. ;)


K, so it was really late the other night and I was really tired and did not have any ambition to make this jar cute. So, this is what it looked like before. Not cute at all. Although I was pretty proud that I came up with some of the phrases to go with the items that I put in the jar, especially with it being so late. ;)

Clear back in February I ordered 4 one hour massages from city deals for $60.00 total. Anyways, we finally used our last set of massages for part of our date yesterday!

We have actually had this gift card for a very long time and decided to finally use it. We ended up going to "Market street grill," and this is the phrase I came up with:

I was going to make Brandon an awesome dessert to come home to but we both decided to make it another night when we can have people over to share it with us!! (Yes he did know about the dessert that I was making for this day, but didn't know that we were having a date night.) Anyways, I put a milky way with this tag because the dessert I was going to make for him has Milky way's in it!!

This is what the jar looks like now! I am excited to be able to use this jar for date nights!!

Monday, August 22, 2011
$3.00 frame re-do
So, remember when I purchased these frames at Hobby Lobby for 90 percent off becoming a total of $1.20 each, clear back in July? Well, I finally finshed them! It matches perfectly with the rest of the projects I have been making to go in Gracey's room. Now I just need to decorate all of it and show you a picture of her room when I am done! That might be awhile though. :)
Here is the before:


Here is the before:

Here are the step by step instructions on how to do these.
It was not easy taking these things off the back of the frame. I did use a paring knife and that seemed to work really good. Just use a knife that you don't really care about or else it might get bent! Sadly, I am speaking from experience.

Once you get the backing off, gently take the letters off as well or they might break. Again, I am speaking from experience. I was even being really really careful too. But you have to be more careful than that! Anyways, then you find the paper you want to use as your new background, cut it out to the desired length and width and glue it on top of the original square wood piece. I just used wood glue to glue mine together.

Then you want to make sure you clean your glass, especially on the inside. Otherwise it will be dirty from the inside forever...or until you want to re-do this project again.

Then, I just cut some ribbon and pulled out some old bows that I had and hot glue it to the rest of the frame. It worked out perfectly because I made these bows for Audrey when she was little, about Gracey's age, but she has not worn them since and I figured I would use them for this project since we haven't been using them for it's intended use anyways. Although, you could always just use the clip on the back of the bow and clip it onto the ribbon (which I did with the letter "R," picture). That way if you want to still use the bows for your girls' hair, you can. Just put it back on the frame when you are finished. :) I should have thought about doing the other bows like that sooner.
Oh well.


This is the after! I can't wait until I get around to finally putting all of these projects for Gracey's room where they need to be!

Sunday, August 21, 2011
Spotlight of the week- Olivia
This week, the lucky winner of the spotlight of the week is...... Olivia!! Olivia is my new niece from my brother-in-law's new wife! Anways, so Audrey picked out her name last week. I really try to keep my spotlight of the week gifts between $1-2 dollars if not less. I know I have probably said this a million times, but Audrey really does love doing this with me. She loves when she can pick out somebody's name and she loves to draw them a picture too. She does also love to help me make whatever it is I am making for the spotlight that week. It's so fun to get her involved with this!
Anyways, I was at the dollar tree the other day and was looking around figuring out what I could do for Olivia. So, I used this idea that I used to make part of Brandon's valentines gift, and made one for her..except a bit smaller. :) I found a cupcake tin at the dollar store and immediately thought of using that idea. But this time I put a couple of bows that I made, some candy and little notes to go on the candy inside the cupcake tins. Then I just covered it with the paper that I had at home. It was so fun to make and you can be sure that I am going to make more of these because they are sooooo easy and such a fun little gift to give and receive for that matter. And it's so inexpensive!! That is my kind of crafting! haha!
So, this is what you do. Get a tin fill it up with the person's favorite things.

Then you find some cute paper that you think will suit the person you are doing the spotlight for.


Then you add a tag to the top of it and I actually added some butterflies to add to the top of the paper as well. It gave it some more character!! I just cut out the butterflies that came with this paper pad that I had, and glued it onto the circled paper. (By the way, all of the paper that you see me craft with, is all from Hobby Lobby!! They have some amazingly cute paper pads.)

Anyways, I was at the dollar tree the other day and was looking around figuring out what I could do for Olivia. So, I used this idea that I used to make part of Brandon's valentines gift, and made one for her..except a bit smaller. :) I found a cupcake tin at the dollar store and immediately thought of using that idea. But this time I put a couple of bows that I made, some candy and little notes to go on the candy inside the cupcake tins. Then I just covered it with the paper that I had at home. It was so fun to make and you can be sure that I am going to make more of these because they are sooooo easy and such a fun little gift to give and receive for that matter. And it's so inexpensive!! That is my kind of crafting! haha!
So, this is what you do. Get a tin fill it up with the person's favorite things.

Then you find some cute paper that you think will suit the person you are doing the spotlight for.

I just happened to have an empty ribbon container on my table that I used to make a circle to fit on the tin and it worked PERFECTLY!!!! It was just the right size.

Then you make your cute phrases to go with the candy. :) On the "Bow-tiful," that I used on the blue bow, I think next time I will write "Bow-u-tiful." It sounds better!

Then you add magnets to the back of your paper.

Then you add those pieces of paper that you cut out earlier, to the tin like so.


Then you add a tag to the top of it and I actually added some butterflies to add to the top of the paper as well. It gave it some more character!! I just cut out the butterflies that came with this paper pad that I had, and glued it onto the circled paper. (By the way, all of the paper that you see me craft with, is all from Hobby Lobby!! They have some amazingly cute paper pads.)

There you have it! I seriously am loving this idea! Not only can you do it for a spotlight gift, but you can do it as a Thank you, a get well present, a condolence, a birthday, anniversary, holiday, you name it!!
Friday, August 19, 2011
Kid craft- Science experiment
We did another science experiment with Audrey the other day. We were lucky and Brandon came home from work just in time to do this experiment with us! Thank goodness too because he was able to explain how it works to Audrey a lot better than I can! Brandon loves science and is so good at it. We had a lot of fun doing this with him. My favorite part was when he was explaining to Audrey the whole process and why the balloon expanded like it did. Audrey was just sitting there listening to him. It was the cutest moment!
Here's what you need: A water bottle, balloon, and cold water.


Here's what you need: A water bottle, balloon, and cold water.


Fill your bowl with ice cold water and fill your water bottle with hot water and let it sit for one minute....

....or longer so you have time to explain the whole process to your child! :) Love this picture of these two by the way!

Then you get all excited for the experiment

Daddy helps by putting the balloon on the bottle like so.

Then you stick it in the cold water.

And watch what happens!!!

Then, when you are a child, I mean Audrey, you want to do it by yourself! 

I don't even know the technical science explanation right now as to why this works. Something about air and it contracting. Haha! :) Good thing Brandon was home to explain it to her and me! haha!
I really did have the reason why this balloon did what it did written down on a piece of paper. So, I really was going to explain it to her using the info I had. Don't worry. :)
Subscribe to:
Posts (Atom)

